JavaScript
Doing an IAmA
Where Do You Vote?
This is a test of the 2008 US Voter Info gadget.
Annotate your YouTube video with AnnoTube
AnnoTube is a jQuery plugin that makes it easy to embed a YouTube video in your page along with an index and notes that are displayed and synchronized with the video as it plays. Each note can be an HTML snippet, or a URL to be loaded into an IFRAME, or even a JavaScript function to be run when a specific time in the video is reached.
Here’s a demo: the Mapping the Votes talk I gave at Google in April, with annotations provided by AnnoTube. This solves a mistake I made in this talk: Like many speakers, I left the text too small in my code examples. It looked fine to the people in the room, but the code is really hard to read in the YouTube video. But with the annotations I can put big, readable text right next to the video at the right time.
Fair warning: At this moment, I’ve only annotated the first 15 minutes of the video, and all of the notes so far are actually web pages in an IFRAME. Also, the AnnoTube plugin itself isn’t quite ready for general use. This is all a bit of work in progress, which started with something I put together for fun during the Google I/O conference. I’m only posting now because the YouTube API team is mentioning it in a post of their own, so please watch this page for updates over the next few days.
For a start, here’s what the timeline for my talk looks like (with URLs shortened to avoid long lines):
As you can see, it’s just a simple list of times, titles, and links or HTML snippets. AnnoTube takes care of connecting the events and watching for the times you specify.
More details soon… Thanks for your interest and patience!
Pennsylvania Primary Google Map
Another day, another primary, another Google map. This time we added a bunch of demographic information using little sparkline graphs, with help from Jim Barnes of the National Journal. I think the voter registration by age is especially interesting. Check it out:
(The map probably won’t load in an RSS feed, so click through to the article to see it.)
You can get this map for your own site!
Mapping the Votes - resources
I want to thank everyone who came to my Mapping the Votes talk at Google. The talk is available on YouTube - with apologies for the small font size in the code samples!
Here are some links and information that I referred to in the talk.
Maps and mapplets
Decision 2008 - the current election mapplet
Decision 2008 Gadget - the election map as a Google Gadget
Iowa Republican Caucus - an early API map
Iowa mapplet - an early mapplet
Twitter election map - the Super Tuesday twitter map (showing tweets from that day)
Campaign Trail - candidate calendars
New Hampshire in Google Earth - a KML file
Editors and desktop tools
The editor I used for the code samples is the one I use every day, Komodo IDE. Komodo’s debuggers for Ruby, Python, and PHP make it really easy to test my batch/script/server code. I’m especially fond of coding in the debugger. For the code that converts shapefiles and vote data into JSON output, I’d write the input part first, set a breakpoint and stop in the debugger after it reads the data, then write the conversion code with live data to look at while I code. Komodo also has a JavaScript debugger that works equally well, but most of the time I just use Firebug because of its simplicity.
Komodo IDE isn’t cheap, but I figure it paid for itself really fast. There’s also a free Komodo Edit that everyone should install even if you already have a favorite editor. Both versions have real-time syntax checking, where you get squiggly red underlines for syntax errors and squiggly green underlines for warnings, just like the spelling and grammar checkers in a word processor. This has saved me literally thousands of page reloads when testing, since Komodo catches my syntax errors before I even save the file. Komodo runs on Linux, Mac, and Windows.
One nice thing about GUI editors is that the basic editing works the same in all of them (or should), so it’s easy to switch back and forth if some other editor has a feature you want to take advantage of. Besides Komodo, I also use PSPad (free, Windows only), mostly because of its nice HTML/XML pretty-printer. It cleans up unreadable web page source code real quick.
Another expensive-but-well-worth-it tool for Windows and Mac is Araxis Merge, a terrific file compare and merge program with live editing. I use Merge as the diff/merge program for TortoiseSVN, which makes source control a dream.
A couple of free Windows tools I use every day are Zoom+ for screen zooming and my own JKLmouse for precise cursor control with the keyboard of your notebook computer. With JKLmouse, I can use the TrackPoint for fast cursor motion and then the keyboard for fine pixel-by-pixel movement, seamlessly and with no “modes”. (Sorry, I had to brag!)
Source code
The election map code is open source and is in two Google Code projects. The current code is in the primary-maps-2008 project, and the code for earliest caucuses and primaries is in the gmaps-samples project. (We moved the code to a new project to avoid filling up gmaps-samples!)
If you look at the code, go easy on me: much of it was written under severe time pressure. I asked if the elections could be delayed when I wasn’t quite ready, but even the mighty Google couldn’t seem to arrange that.
Also, if you read the code using the links provided here, there’s an awful lot of indentation, thanks to Google Code displaying my tab indentation using 8 spaces per tab. Shades of K&R! (So, why do I use tabs instead of two-space indents like everyone else? Well, one of the other benefits of Komodo is that unlike most code editors, it lets me edit in a proportional font. Two spaces in a proportional font is almost like not indenting at all.)
Shapefiles
Shapefiles are a wacky file format ![]() used for geographic data. Be thankful that other people have already written programs to pick them apart, so you and I don’t have to.
used for geographic data. Be thankful that other people have already written programs to pick them apart, so you and I don’t have to.
At first, I was using shp2text to convert shapefiles to an easy-to-use XML format (using the --gpx option), but this loses some of the information in the shapefile. More recently, Zachary Forest Johnson, author of the interesting indiemaps blog, wrote shpUtils.py, which decodes shapefiles into usable Python data.
I extended shpUtils.py to calculate correct centroids, area and other information about the shapes, and to fix a few bugs. The updated version is in the primary-maps-2008 project.
Centroids
The election maps use the centroids of the state and county polygons to position markers for those states.
Centroids are one of those things that you think you understand and then find out you were completely wrong. My first guess was the same as Zachary’s, to take the arithmetic mean of all the points (X and Y separately). The Wikipedia article even seems to say this, but it’s talking about the centroid of the points, not the centroid of the polygon that those points define. If you read it carefully, the article does give the correct algorithm, but it’s better explained on this page, along with sample implementations in various languages.
Census bureau shapefiles
The state and county outlines in the election maps come from shapefiles provided by the Census Bureau. Most states report votes by county, but a few New England states report by town (County Subdivisions in the Census Bureau page), and a few other states report by congressional district.
Shapefile simplification
D’oh! I completely forgot to talk about this important topic. The Census Bureau shapefiles have too much detail to be usable in a browser-based map. If you draw polygons from them, it will be much too slow. A tile layer can handle more detail, but the graphic files will be larger than they could be, because of the excess detail.
MapShaper is a free online tool to simplify shapefiles. It is pretty neat—you can see the effect of your simplification in realtime as you try different settings. I used MapShaper for the election maps, with various levels of simplification: simpler for JavaScript and more detailed for tile layers. More recently I discovered the Map Simplification Program which looks ideal for programmed simplification.
The code that processes shapefiles for the election maps is in makepolys.py which generates JSON output, and maketiles.py which generates tiles from that JSON data using ImageMagick.
Votes and delegates
The code to convert vote data from the latest primaries is in voter.py. This processes CSV files provided by the Boston Globe and converts them to JSON data.
Twitter map
The Ruby script that gathers the Twitter updates uses the Jabber::Simple module written by Blaine Cook to create a custom Jabber client that talks to Twitter, and uses the Twittervision API to get geographic information. It parses the XML data with sweet Hpricot, then generates JSON data (but you probably saw that coming). If you like jQuery, you’ll like Hpricot.
Mapplet code
The election mapplet code is in decision2008.xml and map.js. The code for the Campaign Trail mapplet is in campaign-trail.xml and campaign-trail.js. The latter file has the latest versions of the Array.mapjoin(), Array.index(), Object.sort(), S(), and related functions that I talked about. They are at the top of the file, and not yet documented, but you can find examples of each in the code.
More to come
That’s it for now! I’ll be posting more detailed articles on some of these topics. If there is a particular area you’re interested in, please let me know in the comments.
Thanks!
Google adopts my GAsync() API
Ben Appleton of the Google Maps API team posted today that Google has added my GAsync() function to the Mapplet API. I don’t see the function listed in the Mapplet API documentation yet, but it should be there soon.
In the meantime, you can read my post that describes the API and how to use it.
One thing not mentioned in Ben’s post: you can use GAsync() not only to improve your mapplet code, but also to write common code for both a mapplet and a regular Maps API application. To do this, you will probably need to include the GAsync() source code in your application—I don’t know if it’s been made part of the standard Maps API.
Thanks Ben and the Maps API team!
Write the same code for Google Mapplets and Maps API
My last post introduced a new GAsync API for Google Mapplets. I wrote that code to speed up the response time in our new Zvents mapplet. Try out our mapplet—it’s a fun way to discover things to do in your area.
Naturally, I was barely done with the mapplet when the thought came, “Could we use this same code as a Maps API application?” The two APIs are mostly the same except for initialization—and the pesky matter of the Async calls, e.g. map.getCenterAsync() in the Mapplets API vs. map.getCenter() in the Maps API. But having already written the GAsync code, it turns out to be easy to make it work in both a mapplet and a Maps API app. The interface to GAsync doesn’t change at all from the previous version. The only difference is that the function now calls either the Async functions in a mapplet, or the non-Async functions in a Maps API app. And at the end of the function, for the Maps API it calls your callback function immediately—there’s no need to wait for any asynchronous calls.
You still have to write code in the mapplet fashion, with a callback when you want to retrieve information from the map—but now you can write code like this and run it identically in a mapplet or a Maps API app:
Additional code samples are in the original article.
Here is a demo page running the test mapplet from the previous article as a Maps API app.
And here is the updated GAsync code. First, a compact version ready to copy into your mapplet + Maps API code:
And a commented version:
As the code says, enjoy!
A fast and simple async API for Google Mapplets
Update 2007-06-22: Version 2 now supports portable code that runs as both a mapplet and a Maps API app. Read about the update.
If you’re building a Google Mapplet that responds to map movement and resizing, you will soon find yourself writing code like this recent gem of mine:
What is going on here? I have a search() function that takes the current map size, bounds and center, runs a search and displays pins on the map. In a normal Google Maps application I could have simply coded:
But a Google Mapplet lives in a strange and different world. To isolate mapplet code from the Google domain, Google runs the mapplet in an IFRAME loaded from the gmodules.com domain. Cross-domain browser security prevents your code from communicating directly with the Google Maps frame loaded from maps.google.com.
The mapplet API uses the iframe fragment hack to allow limited communication between the mapplet and the Google map. This has two consequences:
The communication is asynchronous. This doesn’t affect the API for functions that simply set map state—they operate on a “fire and forget” basis. But functions that return information can’t do it directly. You have to provide a callback function that receives the information when it is ready.
The communication is slow. Everything is serialized through the fragment identifier (hash) of a hidden IFRAME. The map page and the mapplet frame each have interval timers running to watch for changes to this hash. A single
getSomethingAsync()function call requires all these steps:- Mapplet frame sets the hash to represent the function call.
- Map page timer wakes up, makes the actual Maps API call, and sets the hash to represent the return value.
- Mapplet frame timer wakes up, gets the value from the hash, and calls the callback function.
My code listed above makes three of these round trips to the maps page one after the other, because the callback for each function triggers the next step in the series. That’s a lot of timeouts—enough to cause a noticeable delay.
What if we could somehow combine all three information requests into a single round trip? That should speed things up quite a bit. Imagine a different Mapplet async API where you provide a list of Maps API functions and get back all of their responses in a single callback with multiple arguments. My three nested function calls and callbacks could be reduced to:
(The sharp-eyed reader will note that the search() function could be used directly as the callback because it takes the same arguments:
But we’ll stick with the longer form for this discussion, because it makes it clear what the function arguments are.)
While we’re at it, we can provide a way to retrieve information for more than one object in a single call:
And for functions such as map.fromContainerPixelToLatLngAsync() which take an additional argument, we can allow an optional arguments array after any function name:
Compare that with the equivalent nested functions using the existing API, which would take about three times longer to run:
Good news: We don’t have to wait for Google to implement this zippy GAsync API or something like it. Although the public API only exposes individual xyzAsync() functions, the underlying iframe fragment dispatcher can queue up multiple function calls and return values into a single round trip.
The Google Maps team was kind enough to provide me with a nifty makeBarrier() function that allows us to queue up a number of async calls and get a single callback when all their values are ready. Using this function, my first example can be written as:
As you can see, it’s up to us to count the functions and keep track of the values, but having done that, we can get all three values in a single round trip through the API. It’s literally three times faster than the nested API calls.
Armed with that information, could we code GAsync() as a layer on top of the existing mapplet async APIs? Indeed we can!
You can try out the code right now and see the speed difference with my test mapplet. Go to the Google Maps Developer Preview page, log into your Google account, and click the Add Content link under the Mapplets tab (or click the Browse Content button if that is what is there).
The next page will show a number of existing mapplets. Click the tiny Add by URL link next to the search button at the top of the page, and paste this URL into the URL box that opens up. You can also click this link to see the mapplet source code:
https://mg.to/mapplet/async/async.xml
(When you paste the link, make sure the https:// isn’t duplicated because of the text already in the box.)
Click the Add button and click OK on the confirmation dialog. Then click Back to Google Maps at the top left corner of the page, and you should see a new entry titled A fast simple mapplet async API. Click it to load the mapplet.
An info window should open in the map, displaying several items of information about the map, and the time it required to collect the information using the GAsync() API. Then try the Slow Async API radio button to see the performance using nested async calls.
The GAsync code used in the test mapplet is:
and the corresponding nested async code is:
Finally, here is the GAsync source code. First, a compact version suitable for pasting into your own mapplet (or download async.js):
And a heavily commented version that explains how it works:
Of course, there are still cases where you will have to run one async call after another one. If you need one piece of information as input to a subsequent call, nested async functions are the way to do it. Even then, it may be possible to combine some other async calls into a single GAsync call, wherever they don’t depend on each other’s results. You’ll shave about a quarter second off your mapplet’s response time for every call you combine using GAsync.
Enjoy your simpler and faster mapplet code!
Thanks to Ben A. of Google for mapplet design and coding tips.
Prototype vs. Web 2.0
In yesterday’s Ajaxian, Rob Sanheim reviews a post that explains why programmers should not use JavaScript’s Array type for associative arrays. Array objects should be used only for integer-indexed arrays. The correct type for an associative array in JavaScript is Object, not Array.
Rob is right, of course. A JavaScript Object is an associative array or hash table. An Array is also an Object (in fact, typeof [] == 'object'), but it’s really meant for arrays indexed by integers.
It’s an easy mistake to make, especially for someone who has come from a language where the associative array type is called an array. I don’t think I’ve made this particular mistake, but I have made a similar one. I used to use the for-in loop because I liked its simplicity:
That looks better to me than the C-style loop:
The for-in loop works on an Array because an Array is an Object, but that also means it treats the Array as an Object. It enumerates the array elements because they are also properties of the underlying Object, but it doesn’t necessarily enumerate them in order by index:
In the browsers I tried, this code alerts the letters in the order that they were added to the array, not in index order. But there’s no guarantee about that order either, because the for-in loop doesn’t promise any particular order of enumeration.
Worse, for-in also enumerates any extra properties or methods added to the array:
This alerts the source code for the alert method as well as the three letters in the array, because they are all properties of the underlying Object.
The same thing happens if the alert method is added via Array.prototype:
And that’s where we get into trouble with Prototype, because it adds methods to Array.prototype. This breaks any code that uses for-in on an Array. But as we just discussed, no one should do that, so it won’t be a problem in any properly-written code. Right? Case closed.
The other problem with using Arrays as associative arrays means you can no longer extend
Array.prototype, which is what Prototype 1.5 does to great effect. Prototype did break Object associative arrays in 1.4 with additions to Object.prototype, something that is fixed in 1.5 after much wailing and gnashing of teeth. Some might argue extending any of the built-in objects’ prototypes is bad form, but those people are wrong.
I wouldn’t argue that it’s bad form, but extending the native object prototypes causes real pain for two groups of people:
People who write JavaScript widgets to be used on other websites, and
People who use third-party JavaScript widgets on their sites.
It’s that whole Web 2.0 mashup thing, you know?
As a widget author, if I use Prototype, then sooner or later one of my customers will want to combine my widgets with JavaScript code from somebody who does use a for-in loop on an array—“correct” or not. Or code that uses some other library that also extends Array.prototype—even a different version of Prototype that conflicts with mine.
I love the good taste of syntactic sugar as much as anyone, and if it didn’t break other code I’d be merrily adding methods to the native objects too. But I have to make my code compatible not only with the code I control, but the code I don’t. So it’s no Prototype for me.
Your <body> is in your <head>
I was chasing down a bizarre bug. My JavaScript code was working fine in IE, Firefox, and Safari, until I tried using it here on mg.to. It still worked in Firefox and Safari, but it blew up in IE, with behavior that made no sense at all. I was seeing duplicate copies of DOM elements I created using my DOM creation plugin for jQuery, and all kinds of strange behavior. It was almost as if something was fundamentally wrong with the way the DOM was working.
I’m usually pretty good at tracking down problems, but this one had me stumped. I wanted to look around the the DOM structure, but since this was IE, I couldn’t use any of the usual Firefox plugins such as the DOM Inspector or FireBug. Then I found a great tool for IE troubleshooting, the DebugBar.
I looked at the DOM with the DebugBar, and my jaw dropped when I saw this:
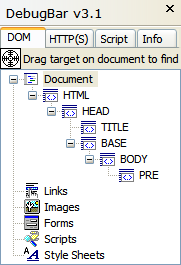
(This screen shot and the others below are from simplified test cases.)
This had to be impossible! The document <body> was inside the <base> tag, which in turn was inside the <head>. The latter I’d expect, but why was <body> not a sibling of <head> as it should be? And how was <base> involved in this?
I got lucky with some searches and found these articles by Justin Rogers from the IE team:
This part of the “Implied tags” article seemed to explain what was going on:
The set of implied rules has impacts in other areas as well. You can, for instance, end up using document.writeln to prematurely terminate your HEAD element and move a bunch of stuff out into the BODY. So, if you are doing inline document writes you should probably do them where you want the content to go. Writing the content out in script blocks that appear in the head is the wrong way to go about it. You could hook up to some events or have a container element that you write into, and that is acceptable, but with inline writes you could get unexpected behavior.
Recently I noticed a site that was doing a document.writeln in their HEAD element about half-way through the head content. End result? Well, the content got moved into the BODY element and the object model tree for the page was completely wrong. Good thing they weren’t navigating the object model looking for stuff and good thing the extra META/LINK elements weren’t being used as well. With a static parse of the page you wouldn’t even notice these problems, but when DHTML becomes involved it can change the structure of your document on the fly and rewrite what the object model tree looks like.
Indeed, this site runs on Drupal, and Drupal 4.6.x does use a <base> tag. (The forthcoming Drupal 4.7 eliminates the <base> tag.)
Justin’s examples showed an unclosed <base> tag like this:
That should be OK; the W3C HTML specification defines the BASE element as EMPTY, so it shouldn’t require any kind of closing tag (except for XHTML compatibility).
The <base> tag that Drupal generates is self-closing in the XHTML style:
However, IE6 does not seem to recognize that the tag is closed (or EMPTY), and it puts everything after that inside the BASE element.
(You may also notice that strictly speaking, Drupal’s <base> tag is incorrect. It should include a filename, but it seems to work OK without it—except for the IE problem.)
On a hunch, I tried closing the tag the old fashioned way:
and presto! Everything started working, and DebugBar revealed that the <head> and <body> elements were siblings, both direct children of <html> as expected.
The bottom line: Every HTML document in the world that uses a <base> tag is being parsed in this odd way by IE, unless an explicit closing </base> tag is used. It doesn’t affect ordinary HTML rendering, but any kind of DOM manipulation may go haywire.
Here are the three test cases. First, the unclosed/empty <base> tag:

The XHTML-style <base /> tag is no better:

And the one that works, with a closing </base> tag:

There is one remaining problem. If you validate your pages as HTML 4.01 Transitional, there is no way to use a <base> tag that works correctly in IE and also validates. The validator barfs on the closing </base> tag, because it figures the tag is already closed (being an EMPTY element).
If you use XHTML 1.0 (either Transitional or Strict), then you can use the closing </base> tag and it will validate. Since most people who validate their pages are probably using XHTML anyway, this shouldn’t be a problem for many.
However, the W3C’s XHTML/HTML Compatibility Guidelines offer this warning:
…use the minimized tag syntax for empty elements, e.g.
<br />, as the alternative syntax<br></br>allowed by XML gives uncertain results in many existing user agents.
Well, that’s just great. The only syntax that works in IE and validates is <base></base>, but W3C warns against it. I haven’t actually seen any problems caused by using this syntax with the <base> tag, though, even in old browsers. So for now, I’m using it and hoping for the best.
Major thanks are due to the DebugBar for pointing me toward the problem, and Justin Rogers for explaining it.
DOM creation: good, bad, and ugly
The Ajaxians are talking about a new $E function that is supposed to make it easier to create DOM elements. The example given creates the equivalent of this HTML code:
using this code to do it:
That seems just a tad complicated! Let’s see how it would look using my DOM creator for jQuery and Prototype:
Ah, that is quite a bit simpler. It’s also more flexible. Suppose you want to save a reference to that A tag in the middle. There’s no way to do that with $E, but it can be as easy as this:
Easy DOM creation for jQuery and Prototype
Here is a jQuery plugin that makes it easy to build up a tree of DOM nodes. It lets you write code like this:
Basically, each function such as $.TABLE creates a DOM node and takes the following arguments:
The first argument is an object that list any attributes to be set on the node. You can specify the className attribute in a few different ways depending on your taste:
Any additional arguments after the first one represent child nodes to be created and appended. These arguments can be DOM elements themselves (e.g. inline $.FOO calls as above), or they can be numbers or strings which are converted to text nodes, or they can be arrays, in which case each element of the array is handled in this same way.
This interface is inspired by Bob Ippolito’s MochiKit DOM API, although it doesn’t implement all of the features of that one (yet).
The code predefines most of the common tags; you can add additional tags by calling:
Or simply add the tag names to the tags list in the code.
One last definition is $.NBSP which defines a non-breaking space (same as in HTML).
$._createNode is an internal helper function used by the $.FOO functions. I would have hidden it away as a nested function, but I wanted to avoid any unnecessary closures.
This code doesn’t actually depend on any of the features of jQuery except for the presence of the $ function—and it uses $ only as a way to avoid cluttering the global namespace. I haven’t tested it with Prototype.js, but it should work equally well there. Or the code can be used with no library, by preceding it with:
Here is the source code, or you can download it:
JSON for jQuery
Update 2007-09-13: As of version 1.2, the jQuery core now supports cross-domain JSONP downloads as part of the native Ajax support. I suggest you use this support instead of the plugin.
jQuery is a nifty new JavaScript library by John Resig. It features a $() function like the one in Prototype.js, but beefed up with CSS and XPath selectors, and with the ability to chain methods to do interesting things with concise code.
Unlike Prototype, jQuery doesn’t mess around with built-in JavaScript objects. It’s new—too new to have a version number!—but I’ve been writing some code with it and enjoying it.
jQuery provides an easy way to write plugin methods to extend the $ function. For you JSON fans out there, here is a JSON plugin for jQuery which lets you write code like this:
You can of course use an anonymous function if you prefer:
Or, using jQuery’s method chaining, you can combine calls like this code which displays a “Loading…” message when it starts loading the JSON resource:
To install the plugin, simply paste this code into a .js file and load it after loading jquery.js:
This adds a json() method to the $ function. The first argument is the URL to the JSON resource, with the text {callback} wherever the JSON callback method should be provided. In a JSONP URL, you would use jsonp={callback}; in a Yahoo! JSON URL you would use format=json&callback={callback}.
The second argument is the callback function itself. When the JSON resource finishes loading, this function will be called with a single argument, the JSON object itself. Inside the callback function, this is a reference to the HTML element found by the $ function. (If $ found more than one element, the callback function is called for each of them.)
The callback function is required, so this code won’t work with plain JSON APIs like del.icio.us that don’t let you specify a callback function. This would be easy enough to fix; I didn’t need it for the code I was writing, and didn’t think of it until just now. :-)
The code goes to a bit of extra work to create both an array entry and a unique global name for each callback. The global name is what is substituted into the {callback} part of the URL. It uses this name instead of the array reference to ensure compatibility with any JSON APIs that don’t allow special characters in the callback name. In fact, in the current code the callbacks[] array entries are not really used, but I figured it could be handy to have an array of all outstanding callbacks.
Update: John Resig suggested a couple of improvements to the code, so it’s updated, simpler and better now.
Update 2: Code updated to include Stephen and Brent’s fixes from the comments.
Ajax-style PDF part 1: fading highlight setup
If you haven’t already seen it, take a look at Adobe’s walking talking PDF tour of Acrobat 7.0. It’s one of the most creative PDF files I’ve ever seen. (Don’t stop after the first few pages; there are some funny bits near the end.)

Obviously, a lot of work went into making this PDF, but the technical side of it is actually pretty simple. We can add some scripting magic to make it even better.
Take page 11, where our narrator explains the links he’s standing next to, pointing to each one as he describes it:

The links just sit there when he points at them. It would look good, and be a nice usability touch, if we could apply an Ajax-style fading highlight to each link as he points to it:

First we need to find out how the existing page works. If you have Acrobat Professional, you can see it by using the Select Object tool on the Advanced Editing toolbar. That’s a Flash movie on the right with the narrator in it. Right click it and open its Properties to see the Page Enter event and a .swf rendition (Acrobat’s term for a media clip and its associated settings):
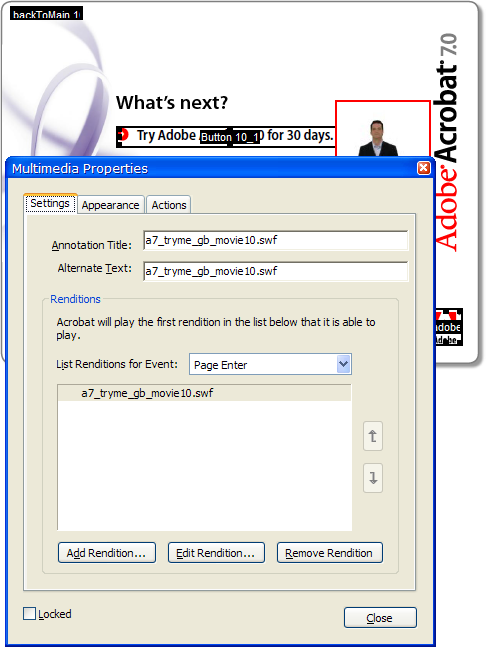
Each page is like this, with a Flash movie embedded in the page that runs on the Page Enter event.
The links on the left are (no surprise) PDF pushbutton form fields.
With our narrator in a Flash movie and the links being PDF buttons, is there a way to connect the two? We can write some JavaScript code in the PDF to fade a highlight on and off for a link, but how do we trigger that code at the right time as the movie plays?
Well, one thing at a time. It would be fun to just see the fading highlight in action, so we’ll write that bit of code first and hook it up to a temporary button to test it. The code will use doc.getField(name) to get a JavaScript Field object, and then it can set the field’s fillColor property to change its background color. If we do that on a repeating fast timer we’ll have the fading highlight effect.
For a quick test before we write any code, we can right click one of the buttons and open its Properties to change its fill color manually:
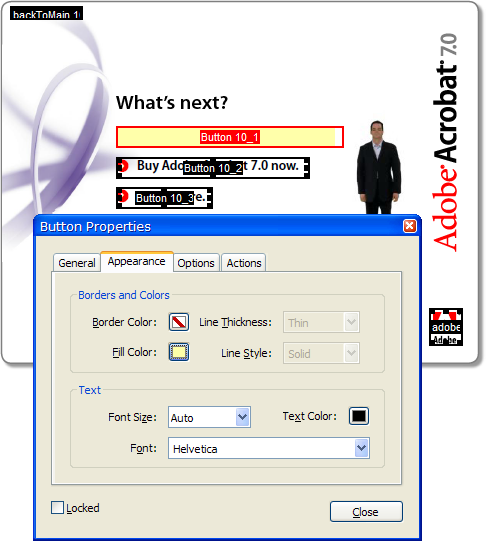
Oops. That worked, but it didn’t do what we want. We got the fill color but the icon and text went away. Let’s Undo it and try something else. (And note that the fill color doesn’t extend all the way to the right end of the field. That’s because the Flash movie overlaps the field. Hopefully this won’t cause any problem.)
We can create a separate field that is a solid rectangle, and if we get the Z-order right it should do what we want. A text field with no text in it will do the trick. Let’s try it without worrying about the exact layout first:
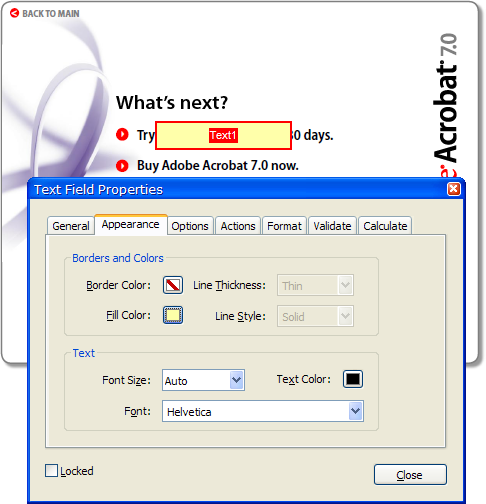
I guess that’s some kind of progress. Maybe changing the Z-order will fix it. The tool to change that is tucked away in Acrobat’s Advanced/Forms/Fields/Set Tab Order menu command:
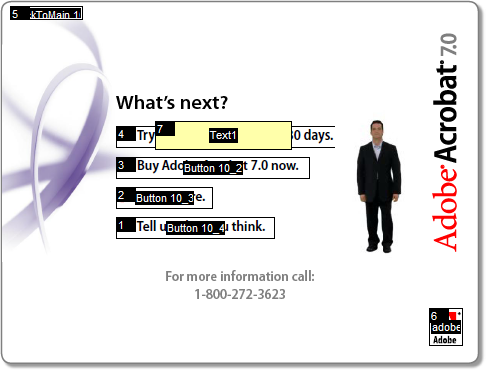
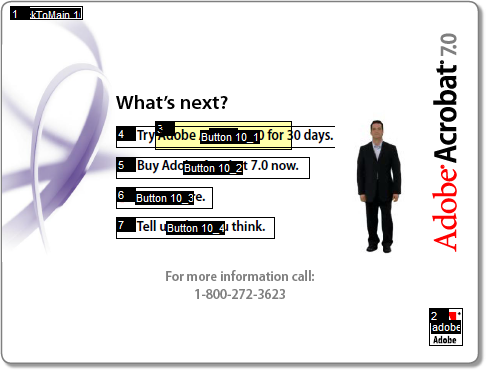
Now we can click on the fields in order to set their tab order (which is also their Z-order), and if we put the text field in the tab order before the button, we get the transparent background highlight we were looking for:
Finally, we move and resize the text field and we have our field highlight, at least in static form. Here’s the page after a Select All (Ctrl+A) to show all the field rectangles:
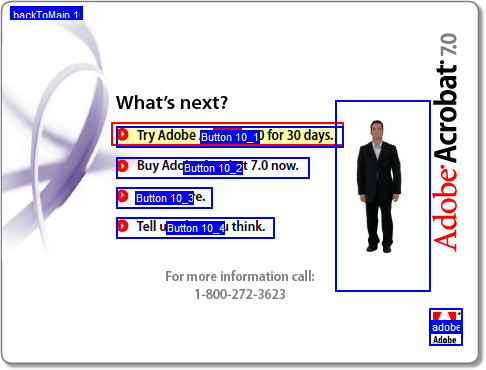
Creating a separate text field for the highlight was a minor nuisance, but does have one benefit: we were able to fine tune the highlight position relative to the button icon and text:

The blue outline is the pushbutton field that we tried to work with originally. As you can see, the pushbutton field rectangle doesn’t have consistent margins around the icon and text (and no margin on the left). With a separate text field—the red outline—we can adjust it so the highlight is positioned nicely:

Now that we have a highlighter field, we should be able to write some code to control it. While I was editing the field I changed its name from the default Text1 to Hilite, so we should be able to use getField and set its fillColor. Let’s try it in the JavaScript console first:
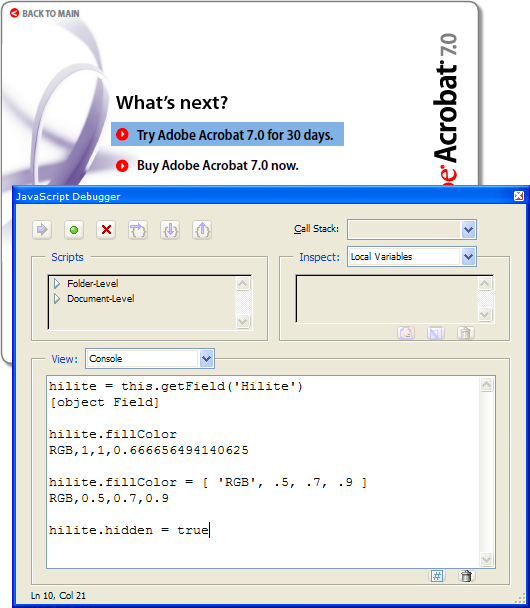
Looks good! We got a reference to the field in the hilite variable and looked at its current fillColor property. Then we changed the fillColor and the visible field changed as expected.
The last statement in the JavaScript console (not yet executed in the screen shot) hides the field, so we can save the file and it looks normal. It doesn’t matter that we left the field the wrong color; we’ll take care of that in the code that makes it visible again. For now, it’s time to save the file and take a break. In the next installment we’ll write some code to create the fading highlight effect.
p.s. Here’s an Acrobat editing tip: Open the General tab of Acrobat’s Preferences dialog and turn on the single-key accelerators. Then you can use the H key for “hand” (normal) mode in Acrobat, R for the object selector, and so on. Hover the mouse over a toolbar button to see its shortcut key. It makes this kind of editing a lot easier where you switch tools so often.
Disclaimer: I work for Adobe, but this is my own summer vacation project, not any kind of offical Adobe code.
Invisible JavaScript functions
If you’re writing document-level JavaScript code in a PDF file, any variables you declare or assign to outside a function are created in the global object, which is the PDF document.
Suppose we have a PDF with this code as a document script, which creates three variables in three different ways:
If we load this PDF and examine its variables in the JavaScript console, we see that each of the three variables is defined both as a global variable and as a property of this, the document object. That seems surprising until you consider that in Acrobat JavaScript, the document object is the global object.
myVar
11
this.myVar
11
myNoVar
22
this.myNoVar
22
myProp
33
this.myProp
33
(Keyboard input is in
bold, and we type Ctrl+Enter at the end of each line to evaluate the expression.)
When you’re writing code, you don’t want to pollute the document object’s namespace needlessly. You can wrap up your code in a function, so that variables you create with a var statement are local to the function.
Adobe Acrobat encourages this by creating a function for you when you add a document script. If you use Acrobat’s Document JavaScripts dialog to add a script called DocScript, you’ll get an empty function to fill in:
doc instead of this. We didn’t have to do that, but I like to be able to use doc.whatever instead of this.whatever for document properties.
If we look at these variables in the console window, the results are different:
myVar1
ReferenceError: myVar1 is not defined
1:Console:Exec
undefined
this.myVar1
undefined
myNoVar1
22
this.myNoVar1
22
myProp1
33
this.myProp1
33
As expected,
myVar1 does not show up either in the global object or the document object; it is local to the function. myVar2 does (because we didn’t use var), as does myProp1 (because we created it as a property of the doc object).
The difference between myVar1 and this.myVar1 is expected too. It’s an error to reference a variable name that does not exist, so myVar1 throws a ReferenceError exception. But it’s not an error to reference a nonexistent property of an object—the reference merely returns the undefined value. So this.myVar1 returns undefined without error.
But we’ve still put one name in the document object:
DocScript

function DocScript(doc) {
    var myVar1 = 11;
    myNoVar1 = 22;
    doc.myProp1 = 33;
}

this.DocScript

function DocScript(doc) {
    var myVar1 = 11;
    myNoVar1 = 22;
    doc.myProp1 = 33;

}
To avoid even this bit of namespace clutter, we can define an anonymous function and call it on the spot:
The console results for myVar2, etc. are the same as the previous example with the named function, so I won’t repeat them. But unlike the named function, we haven’t added any symbols at all to the document or global object.
Why the extra parentheses? function(){} is the simplest possible anonymous function, but if we try to call it using function(){}() it’s a syntax error. However, if we wrap the entire function inside a pair of parentheses, then we can follow that with () to call it: (function(){})() is legal JavaScript.
The same trick works when you want to add a nested scope inside a function. The way you would do this in C doesn’t work in JavaScript:
That code prints:
1
2
2
because there is only one variable named i in the entire function, even though we’ve (incorrectly) tried to add an inner scope with its own variable i.
In fact, if you load that function into ActiveState Komodo, it puts a green squiggly line under the inner var i = 2; complaining “strict warning: redeclaration of var i”.
But if we use a nested anonymous function:
it prints:
1
2
1
which indicates that the nested function introduced a new scope.
