Flash
Annotate your YouTube video with AnnoTube
AnnoTube is a jQuery plugin that makes it easy to embed a YouTube video in your page along with an index and notes that are displayed and synchronized with the video as it plays. Each note can be an HTML snippet, or a URL to be loaded into an IFRAME, or even a JavaScript function to be run when a specific time in the video is reached.
Here’s a demo: the Mapping the Votes talk I gave at Google in April, with annotations provided by AnnoTube. This solves a mistake I made in this talk: Like many speakers, I left the text too small in my code examples. It looked fine to the people in the room, but the code is really hard to read in the YouTube video. But with the annotations I can put big, readable text right next to the video at the right time.
Fair warning: At this moment, I’ve only annotated the first 15 minutes of the video, and all of the notes so far are actually web pages in an IFRAME. Also, the AnnoTube plugin itself isn’t quite ready for general use. This is all a bit of work in progress, which started with something I put together for fun during the Google I/O conference. I’m only posting now because the YouTube API team is mentioning it in a post of their own, so please watch this page for updates over the next few days.
For a start, here’s what the timeline for my talk looks like (with URLs shortened to avoid long lines):
As you can see, it’s just a simple list of times, titles, and links or HTML snippets. AnnoTube takes care of connecting the events and watching for the times you specify.
More details soon… Thanks for your interest and patience!
Ajax-style PDF part 1: fading highlight setup
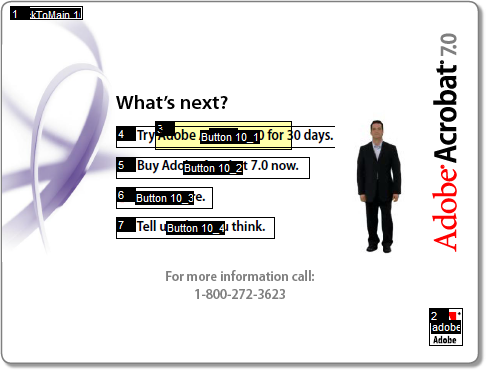
If you haven’t already seen it, take a look at Adobe’s walking talking PDF tour of Acrobat 7.0. It’s one of the most creative PDF files I’ve ever seen. (Don’t stop after the first few pages; there are some funny bits near the end.)

Obviously, a lot of work went into making this PDF, but the technical side of it is actually pretty simple. We can add some scripting magic to make it even better.
Take page 11, where our narrator explains the links he’s standing next to, pointing to each one as he describes it:

The links just sit there when he points at them. It would look good, and be a nice usability touch, if we could apply an Ajax-style fading highlight to each link as he points to it:

First we need to find out how the existing page works. If you have Acrobat Professional, you can see it by using the Select Object tool on the Advanced Editing toolbar. That’s a Flash movie on the right with the narrator in it. Right click it and open its Properties to see the Page Enter event and a .swf rendition (Acrobat’s term for a media clip and its associated settings):
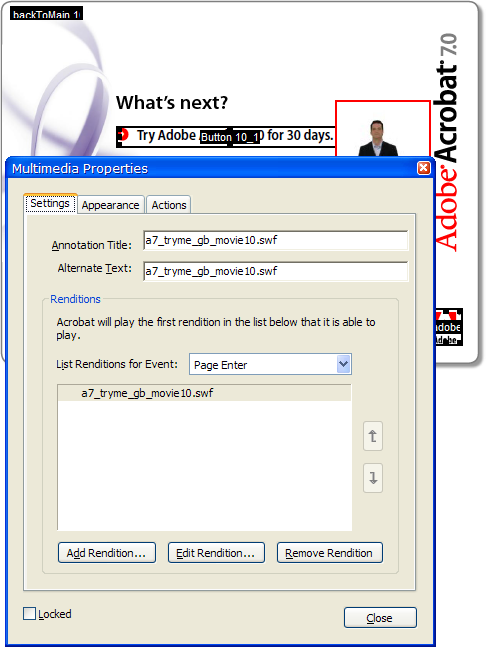
Each page is like this, with a Flash movie embedded in the page that runs on the Page Enter event.
The links on the left are (no surprise) PDF pushbutton form fields.
With our narrator in a Flash movie and the links being PDF buttons, is there a way to connect the two? We can write some JavaScript code in the PDF to fade a highlight on and off for a link, but how do we trigger that code at the right time as the movie plays?
Well, one thing at a time. It would be fun to just see the fading highlight in action, so we’ll write that bit of code first and hook it up to a temporary button to test it. The code will use doc.getField(name) to get a JavaScript Field object, and then it can set the field’s fillColor property to change its background color. If we do that on a repeating fast timer we’ll have the fading highlight effect.
For a quick test before we write any code, we can right click one of the buttons and open its Properties to change its fill color manually:
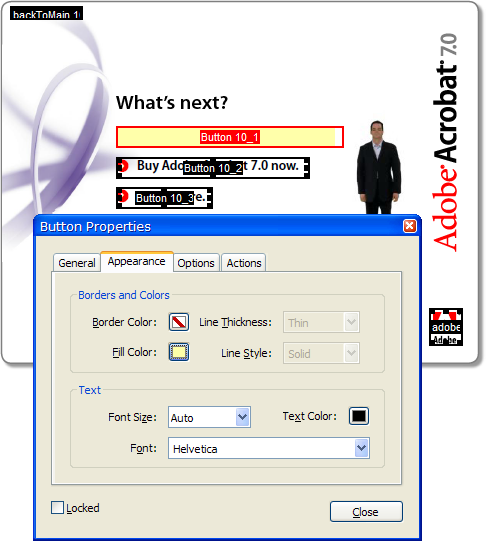
Oops. That worked, but it didn’t do what we want. We got the fill color but the icon and text went away. Let’s Undo it and try something else. (And note that the fill color doesn’t extend all the way to the right end of the field. That’s because the Flash movie overlaps the field. Hopefully this won’t cause any problem.)
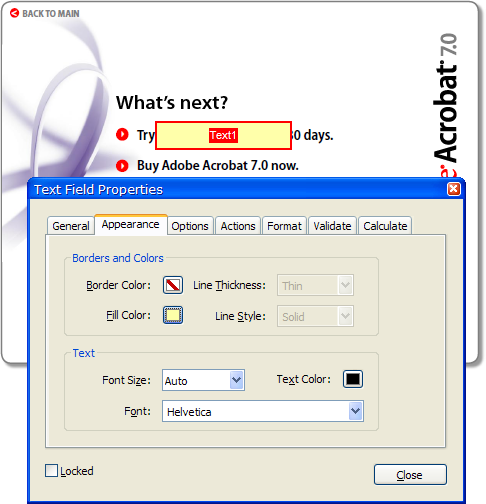
We can create a separate field that is a solid rectangle, and if we get the Z-order right it should do what we want. A text field with no text in it will do the trick. Let’s try it without worrying about the exact layout first:
I guess that’s some kind of progress. Maybe changing the Z-order will fix it. The tool to change that is tucked away in Acrobat’s Advanced/Forms/Fields/Set Tab Order menu command:
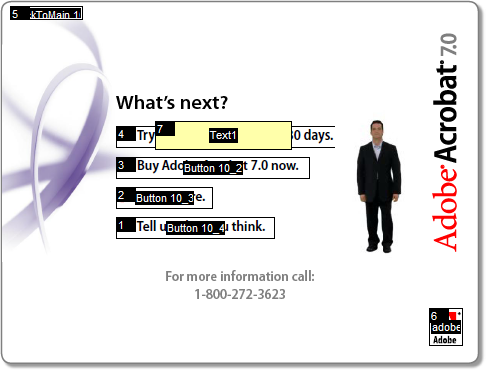
Now we can click on the fields in order to set their tab order (which is also their Z-order), and if we put the text field in the tab order before the button, we get the transparent background highlight we were looking for:
Finally, we move and resize the text field and we have our field highlight, at least in static form. Here’s the page after a Select All (Ctrl+A) to show all the field rectangles:

Creating a separate text field for the highlight was a minor nuisance, but does have one benefit: we were able to fine tune the highlight position relative to the button icon and text:

The blue outline is the pushbutton field that we tried to work with originally. As you can see, the pushbutton field rectangle doesn’t have consistent margins around the icon and text (and no margin on the left). With a separate text field—the red outline—we can adjust it so the highlight is positioned nicely:
Now that we have a highlighter field, we should be able to write some code to control it. While I was editing the field I changed its name from the default Text1 to Hilite, so we should be able to use getField and set its fillColor. Let’s try it in the JavaScript console first:
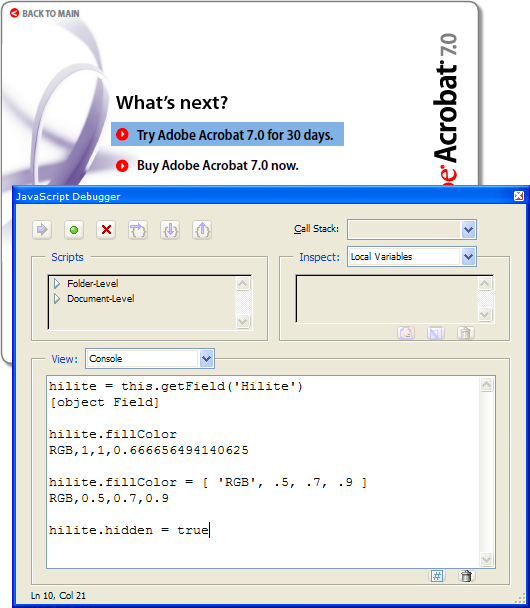
Looks good! We got a reference to the field in the hilite variable and looked at its current fillColor property. Then we changed the fillColor and the visible field changed as expected.
The last statement in the JavaScript console (not yet executed in the screen shot) hides the field, so we can save the file and it looks normal. It doesn’t matter that we left the field the wrong color; we’ll take care of that in the code that makes it visible again. For now, it’s time to save the file and take a break. In the next installment we’ll write some code to create the fading highlight effect.
p.s. Here’s an Acrobat editing tip: Open the General tab of Acrobat’s Preferences dialog and turn on the single-key accelerators. Then you can use the H key for “hand” (normal) mode in Acrobat, R for the object selector, and so on. Hover the mouse over a toolbar button to see its shortcut key. It makes this kind of editing a lot easier where you switch tools so often.
Disclaimer: I work for Adobe, but this is my own summer vacation project, not any kind of offical Adobe code.